
 1655
1655
Time Banks in Pace Scheduler automatically track and manage employees’ accrued time—such as vacation, comp time, or other leave balances. The system handles deposits, withdrawals, and accruals automatically while logging every change so you can always see where hours are added or deducted.
This guide explains how to create time banks, link them to time-off and overtime types, enter balances, and configure balance caps.
Applies to
Roles: Admin, Supervisor
Prerequisites:
-
Time Banks must be enabled on your site. Contact Pace Support if they are not.
-
You must have permission to access the Admin tab.
Before you begin
-
Confirm that Time Banks are enabled on your site.
-
Review your Time Off Types and Overtime Types so you know which ones should affect balances.
-
Decide whether your department will use a single balance cap for everyone or individual caps per user.
Steps
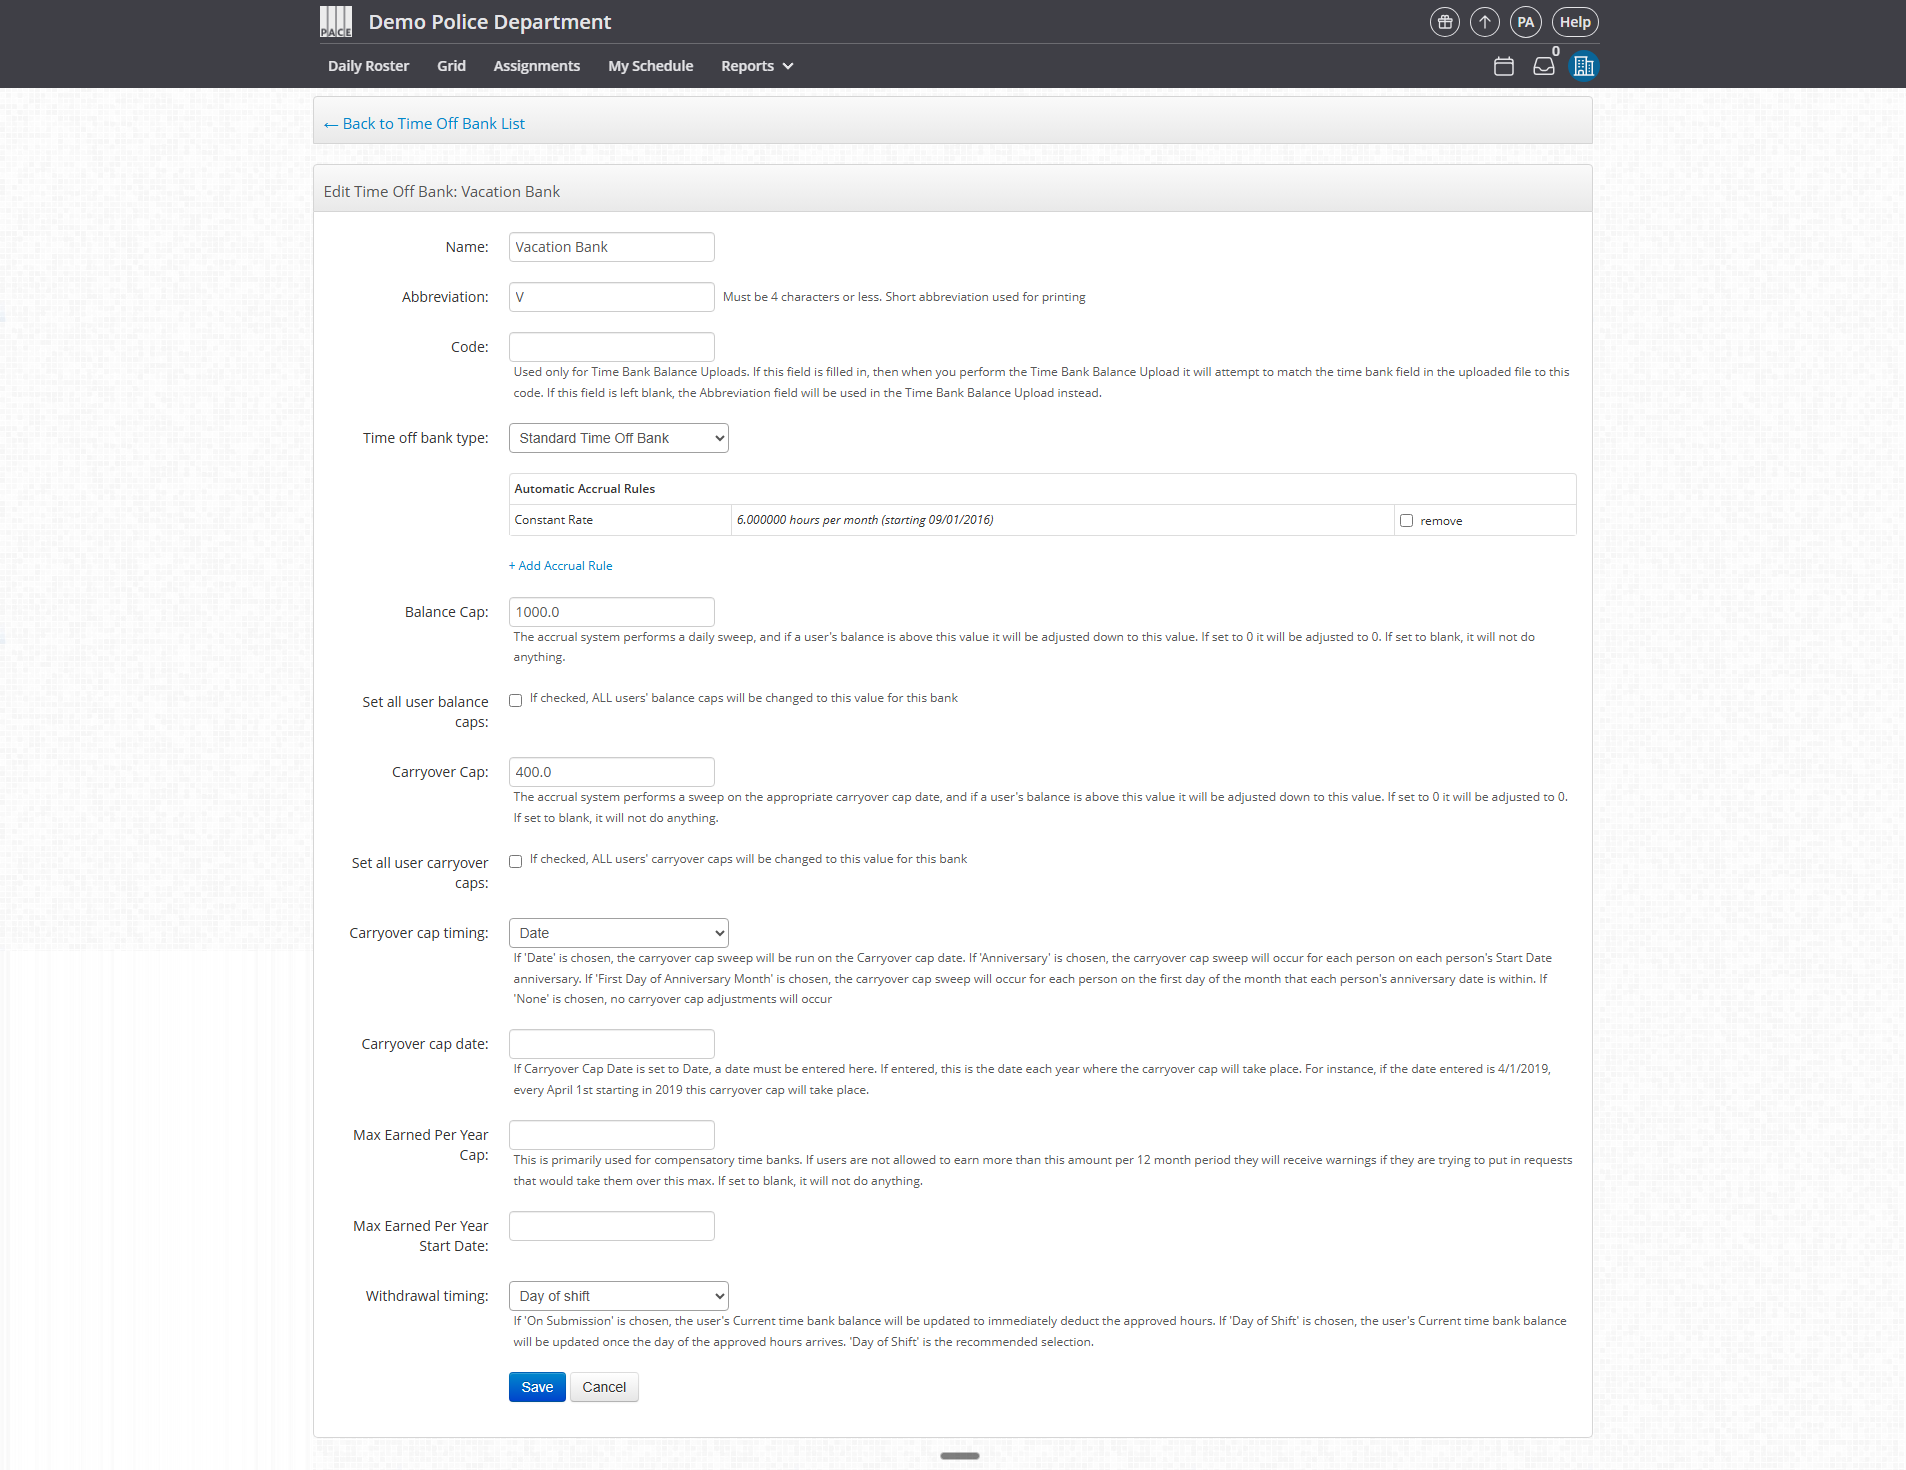
1. Create a Time Bank
-
Go to Admin Panel > Banks & Balances > Time Banks.
-
Click + Create Time Off Bank at the top-left of the page.
-
Fill out the following fields:
-
Name: Enter what the bank should be called (for example, “Vacation” or “Comp Time”).
-
Abbreviation: A short label used in dropdowns and reports if the full name is too long.
-
Code: (Optional) Used only for Time Bank Balance Uploads.
-
Time Off Bank Type: Choose one of the following options:
-
Standard Time Off Bank — works as an independent, standalone balance.
-
Linked Time Off Bank — mirrors deposits and withdrawals from another existing bank.
-
Note: Linked banks do not automatically receive accruals. If you want accruals to match, create a duplicate rule in the linked bank.
-
-
-
Automatic Accrual Rules: (Optional) Allows hours to accrue automatically on a defined schedule. These are configured separately.
-
Balance Cap: Sets the maximum number of hours a user can hold in that bank. Any deposits beyond this cap are ignored.
-
Carryover Cap: Defines the maximum number of hours that can roll into a new year.
-
Carryover Cap Date: Sets the start of the new 12-month carryover period.
-
-
Click Create.
-
The new bank will appear in your Time Banks list.
-
You can create as many banks as needed.
-
If you plan to create a linked bank, make sure the standard bank exists first.
-
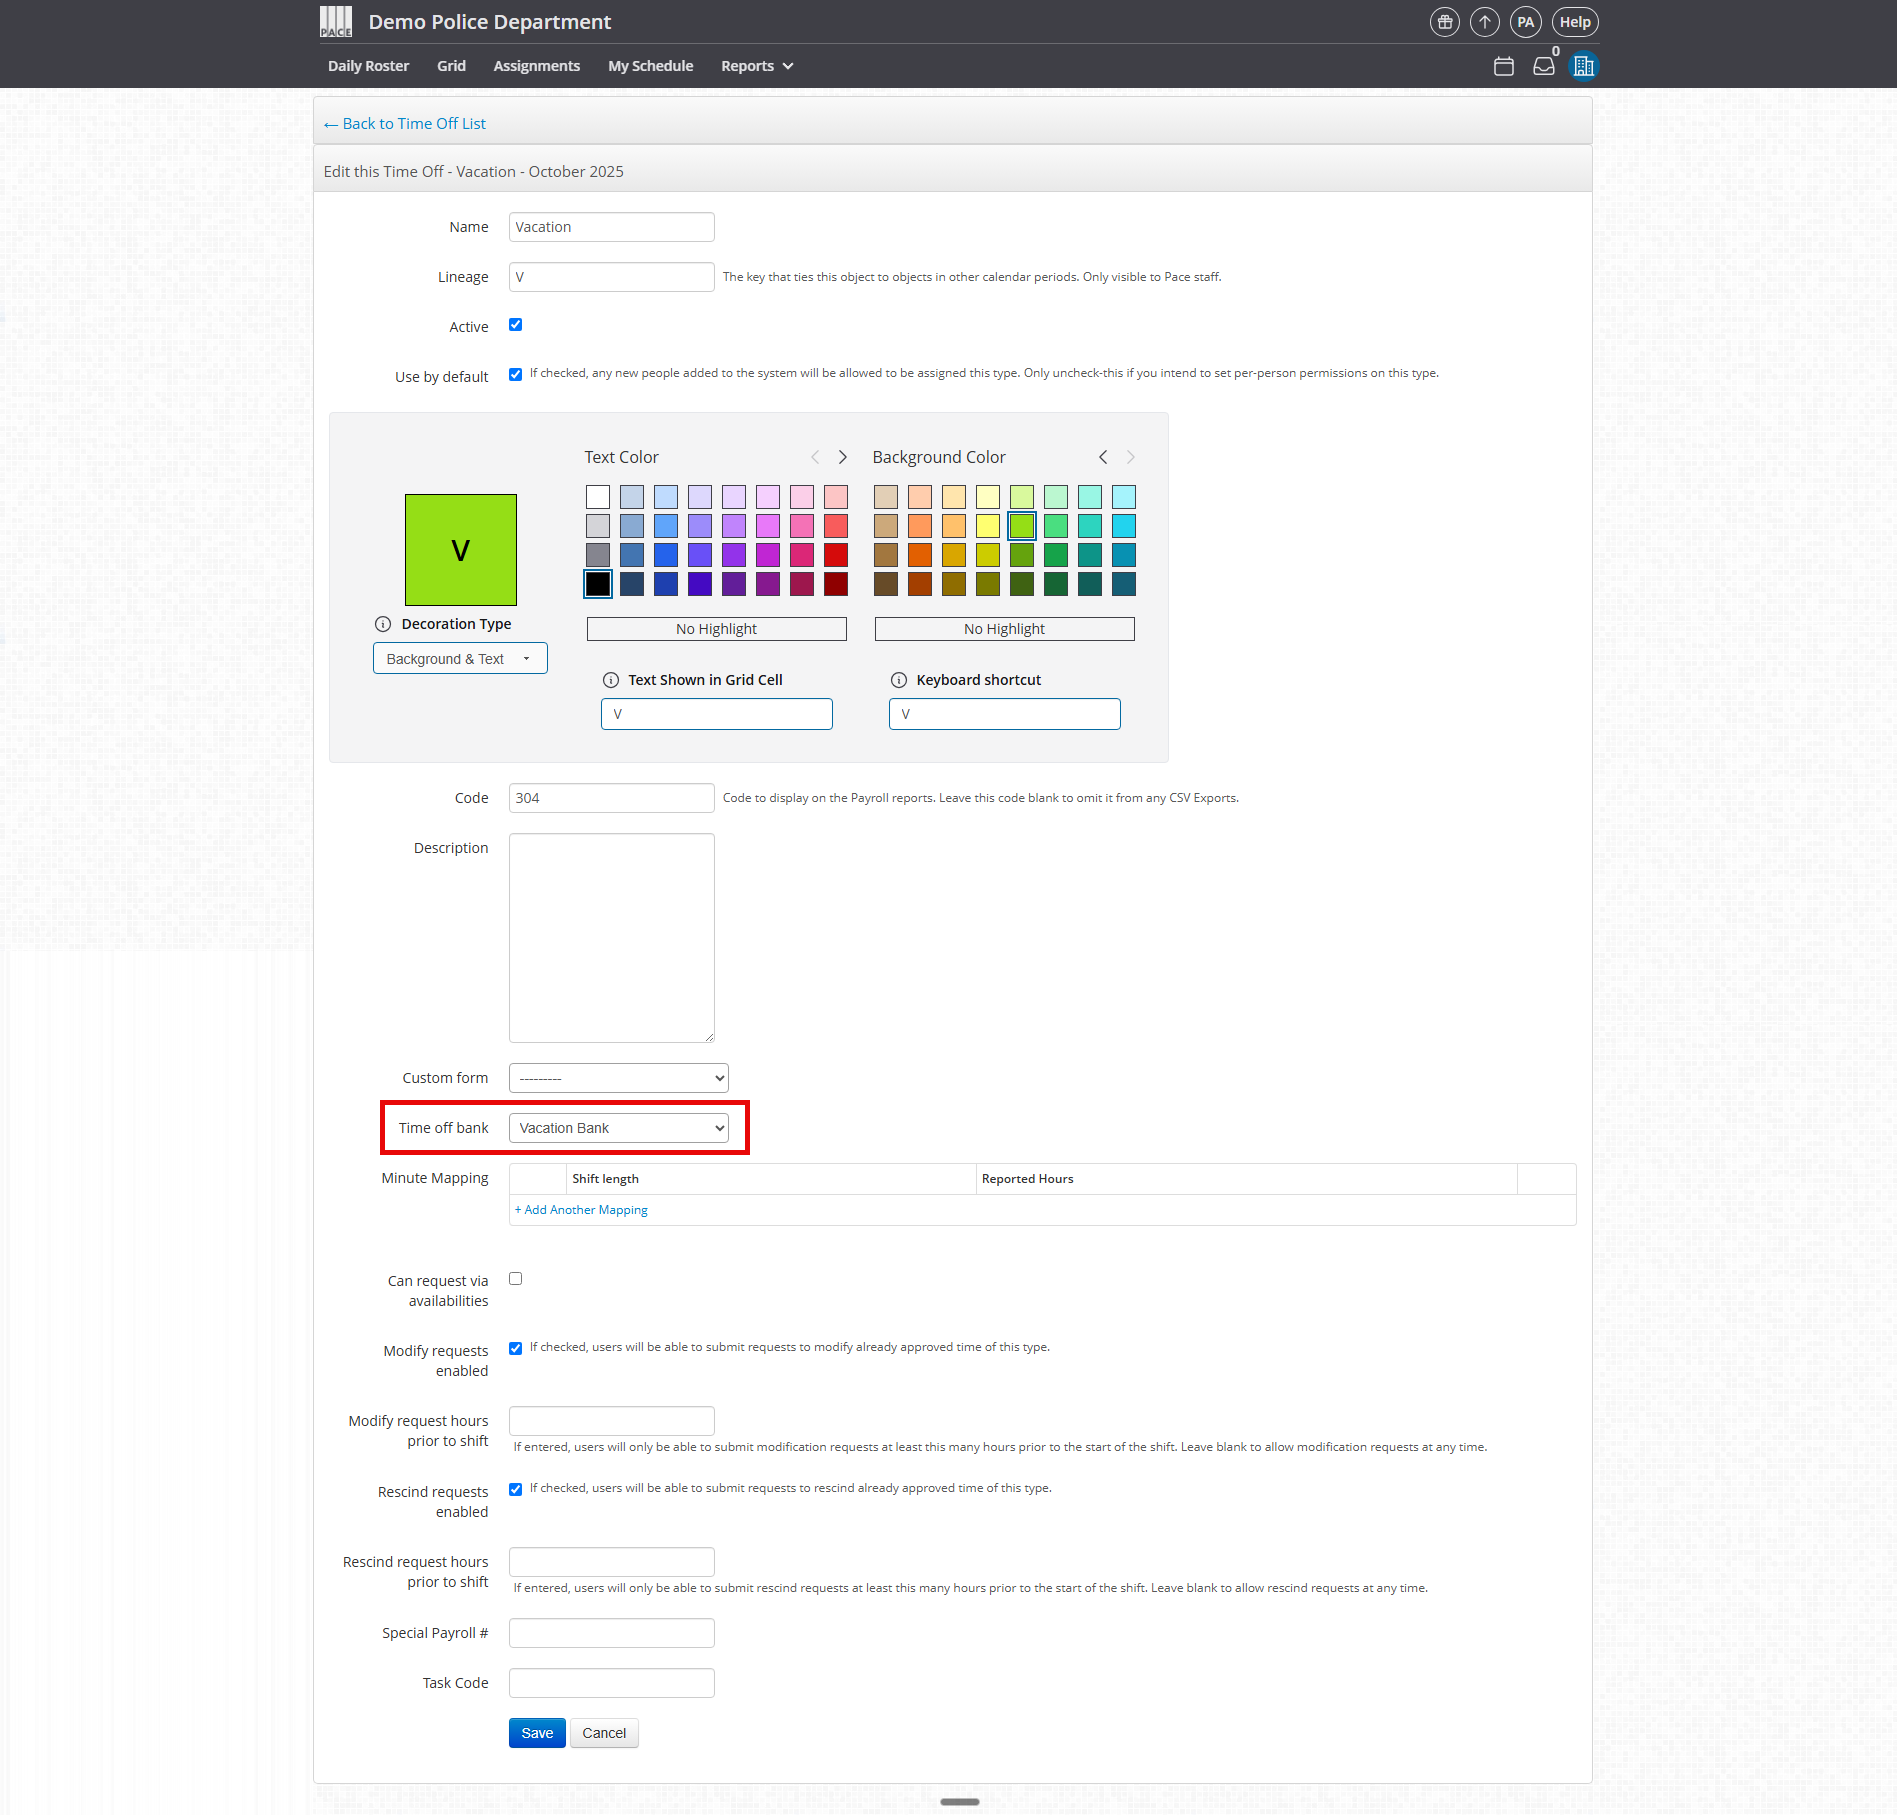
2. Link Time-Off Types to a Time Bank
To automate balance deductions when employees take time off:
-
Go to Admin Panel > Shift Modifiers > Time Off Types.
-
Click Edit next to the type you want to link (for example, “Vacation”).
-
Find the Time Off Bank field and select the bank you just created.
-
Click Save.
Repeat this process for each Time Off Type that should deduct from a bank.
Notes:
-
Each Time Off Type can only be linked to one bank.
-
A single bank can be linked to multiple Time Off Types.
-
Leave the “Time Off Bank” field blank for types that should not affect balances, such as Bereavement or Jury Duty.
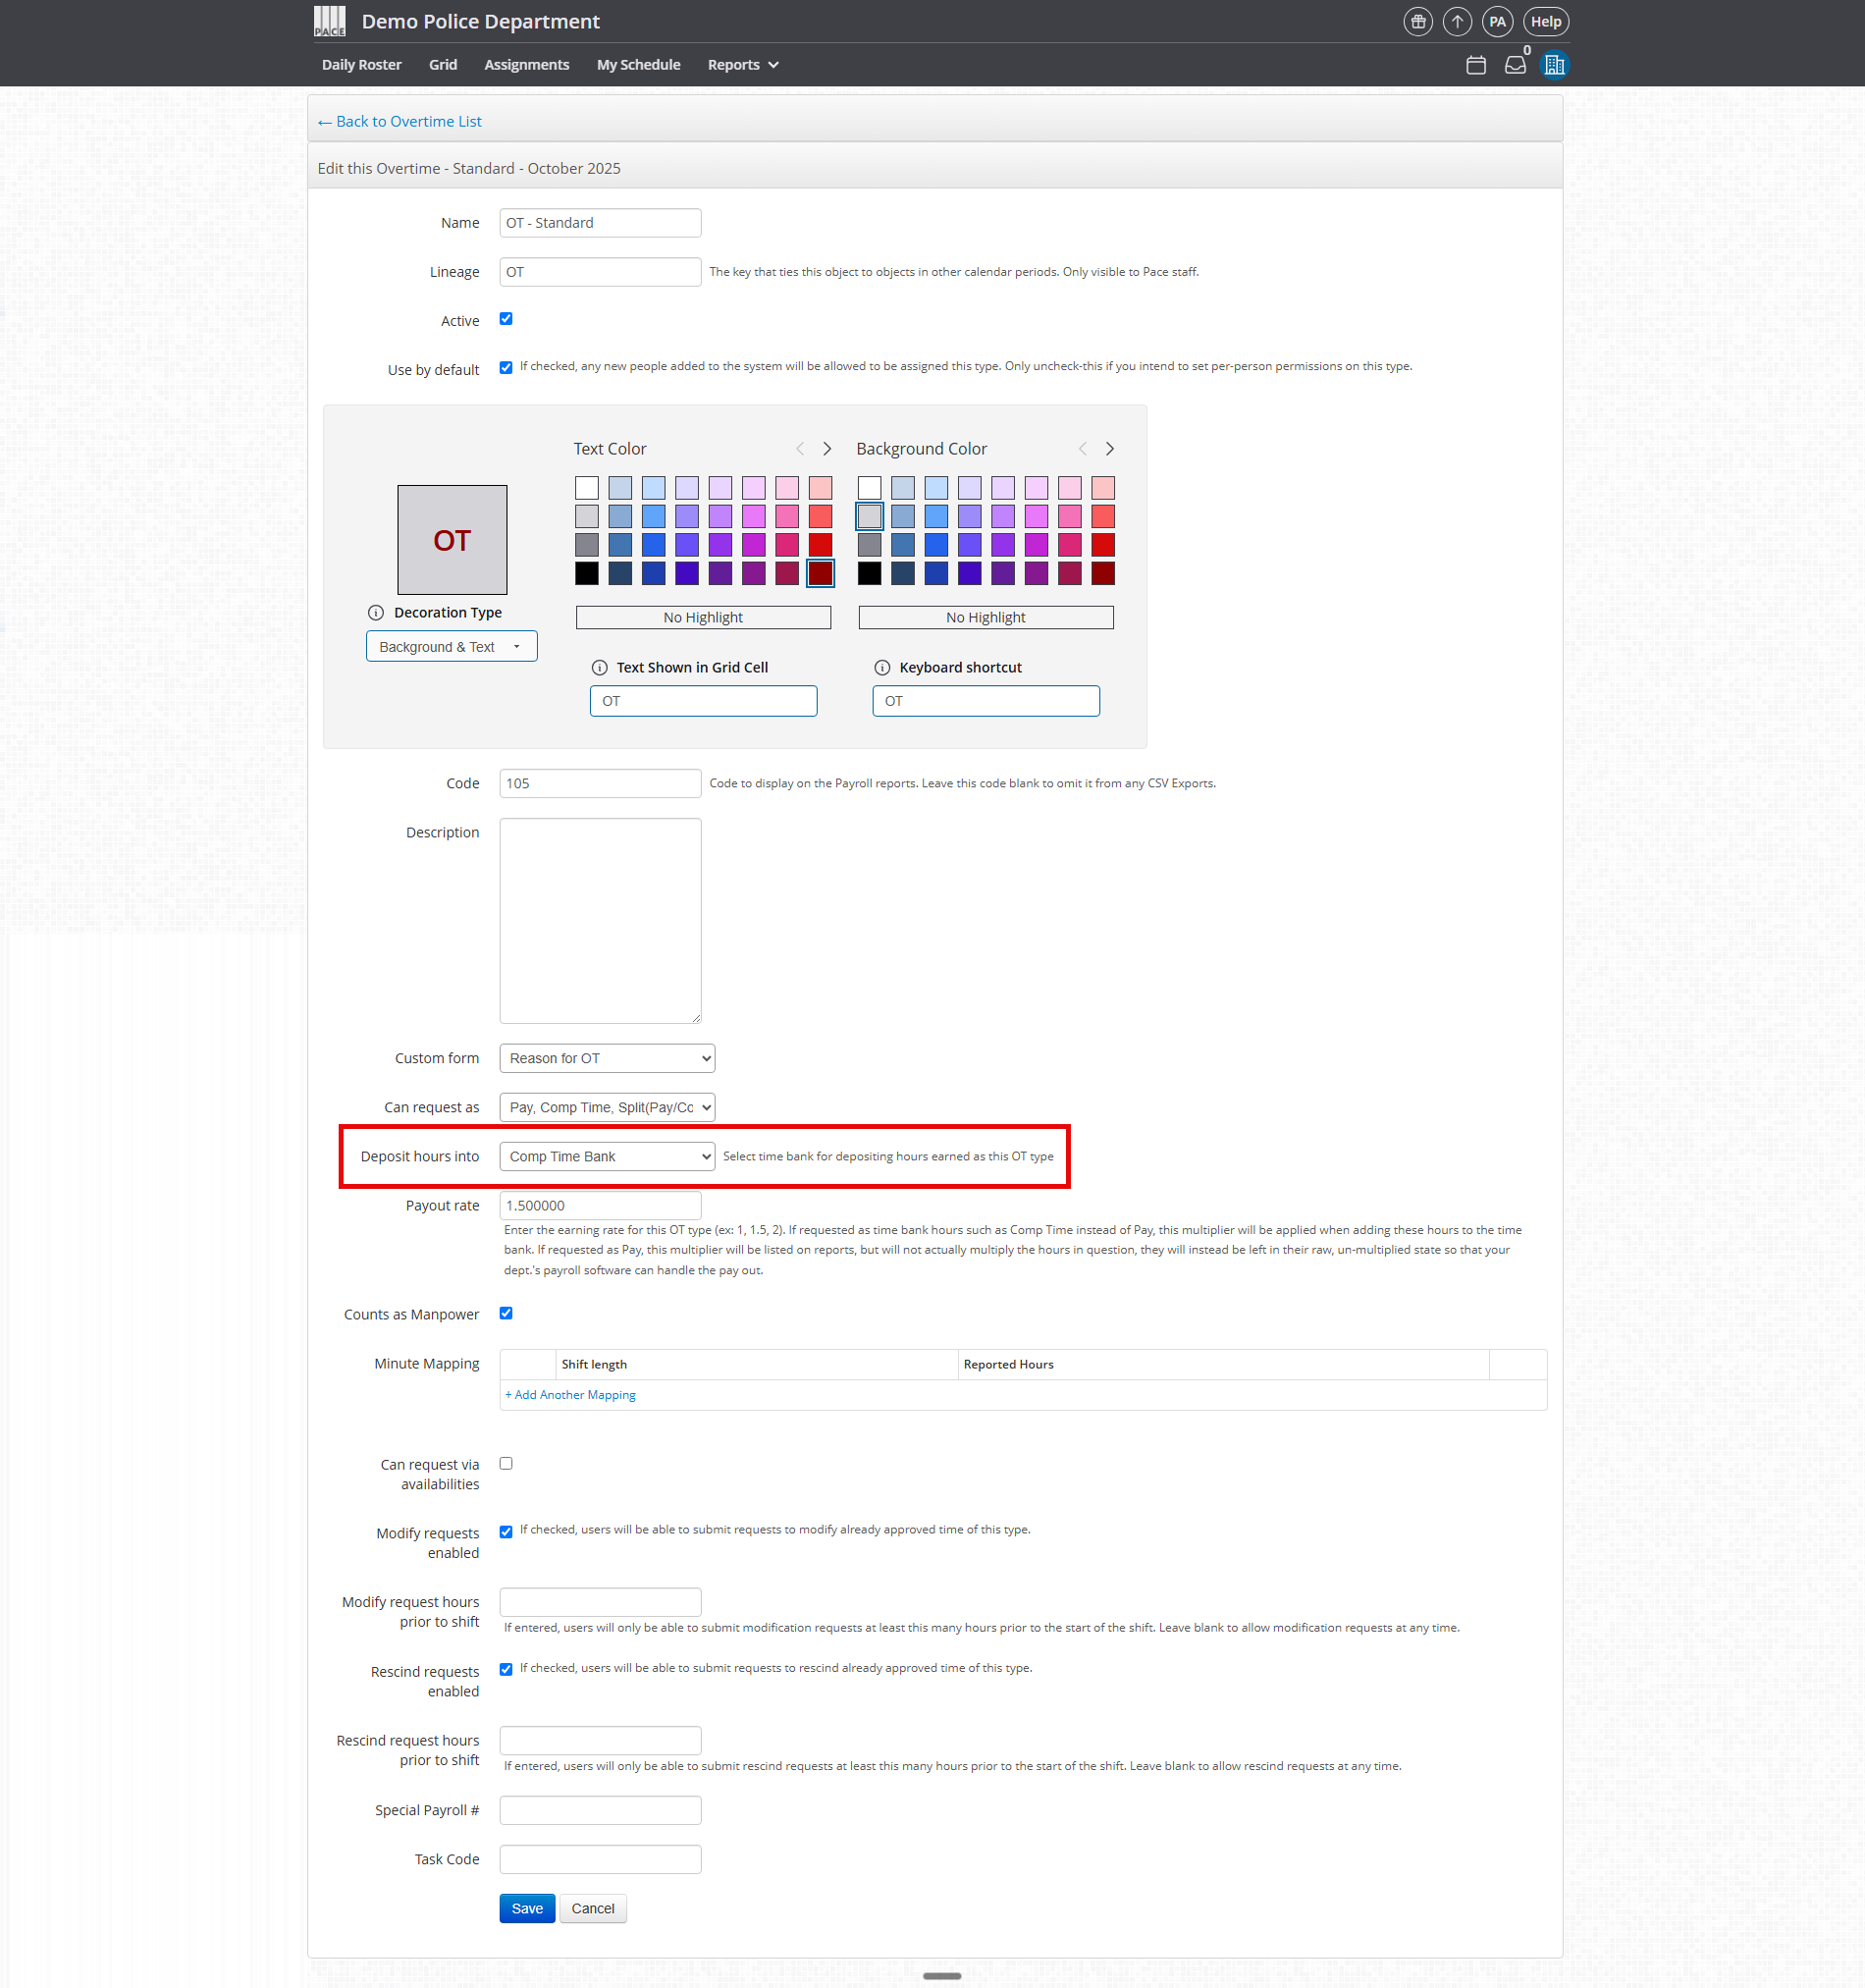
3. Link Overtime Types to a Time Bank
To allow users to bank overtime as comp time instead of pay:
-
Go to Admin Panel > Shift Modifiers > Overtime Types.
-
Click Edit next to the overtime type you want to configure (for example, “OT – Standard”).
-
Review and adjust these fields:
-
Can Request As: Determines how the overtime can be earned or credited.
-
Pay — can only be received as a cash payout.
-
COMP_TIME_NAME — can only be earned as banked hours.
-
Pay, COMP_TIME_NAME — user can choose between pay or comp.
-
Pay, COMP_TIME_NAME, Split (Pay/COMP_TIME_NAME) — user can choose a combination of both.
-
-
Deposit Hours Into: Select the Time Bank that will receive deposited comp hours.
-
Payout Rate: Sets the multiplier for hours earned as comp time (for example, 1.5×). This only affects banked hours.
-
Important: Payout multipliers for overtime pay are usually handled by your payroll software. Do not apply them here for pay-based requests to avoid double-multiplying pay rates.
-
Click Save.
Once saved, overtime requests marked as comp time will automatically deposit hours into the selected Time Bank.
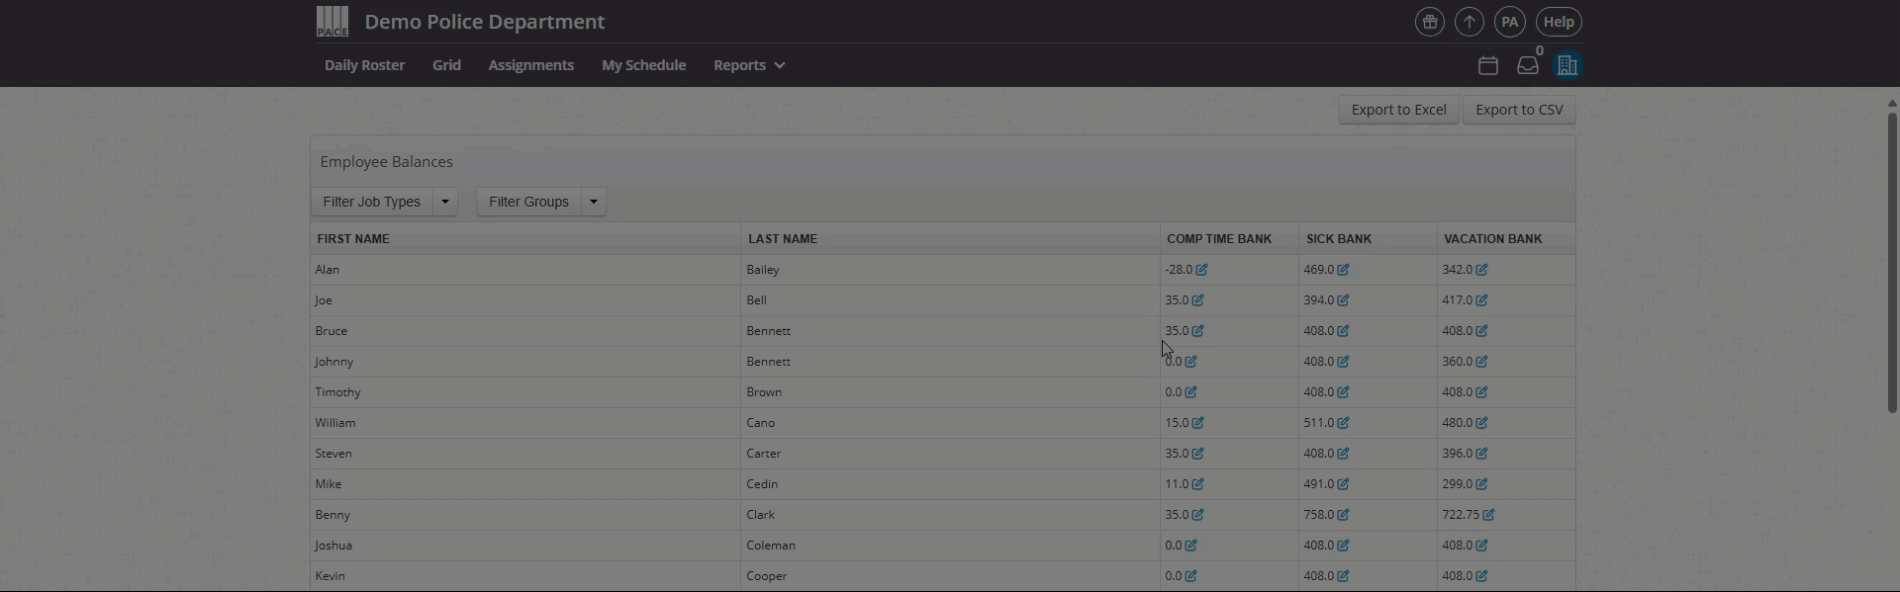
4. Enter Employee Balances
After linking banks, enter each employee’s current balance.
-
Go to Admin Panel > Banks & Balances > Bank Balances.
-
Find the employee and click the pencil icon next to their balance.
-
Type in the correct balance and press Enter or click the blue checkmark.
Changes save instantly.
5. Configure Time Bank Balance Caps
What Balance Caps Do
A balance cap sets the maximum number of hours an employee can hold in a particular bank. The system enforces this in two ways:
-
Nightly Sweep (1:00 AM CST):
Every night, the system compares each user’s current balance to the cap. If the balance exceeds the cap, it’s reduced down to the maximum allowed. -
Overtime Conversion:
If an overtime request paid as comp time would exceed the cap, the system automatically converts the excess hours to cash pay.
For example:-
The cap is set to 100 hours.
-
An employee currently has 94 hours.
-
They submit an 8-hour OT request at 1.5×, which equals 12 hours.
-
The system automatically deposits 6 hours into their comp bank and converts the remaining 6 to overtime pay.
-
Both employees and approvers will see a warning if approving a request would exceed the cap.
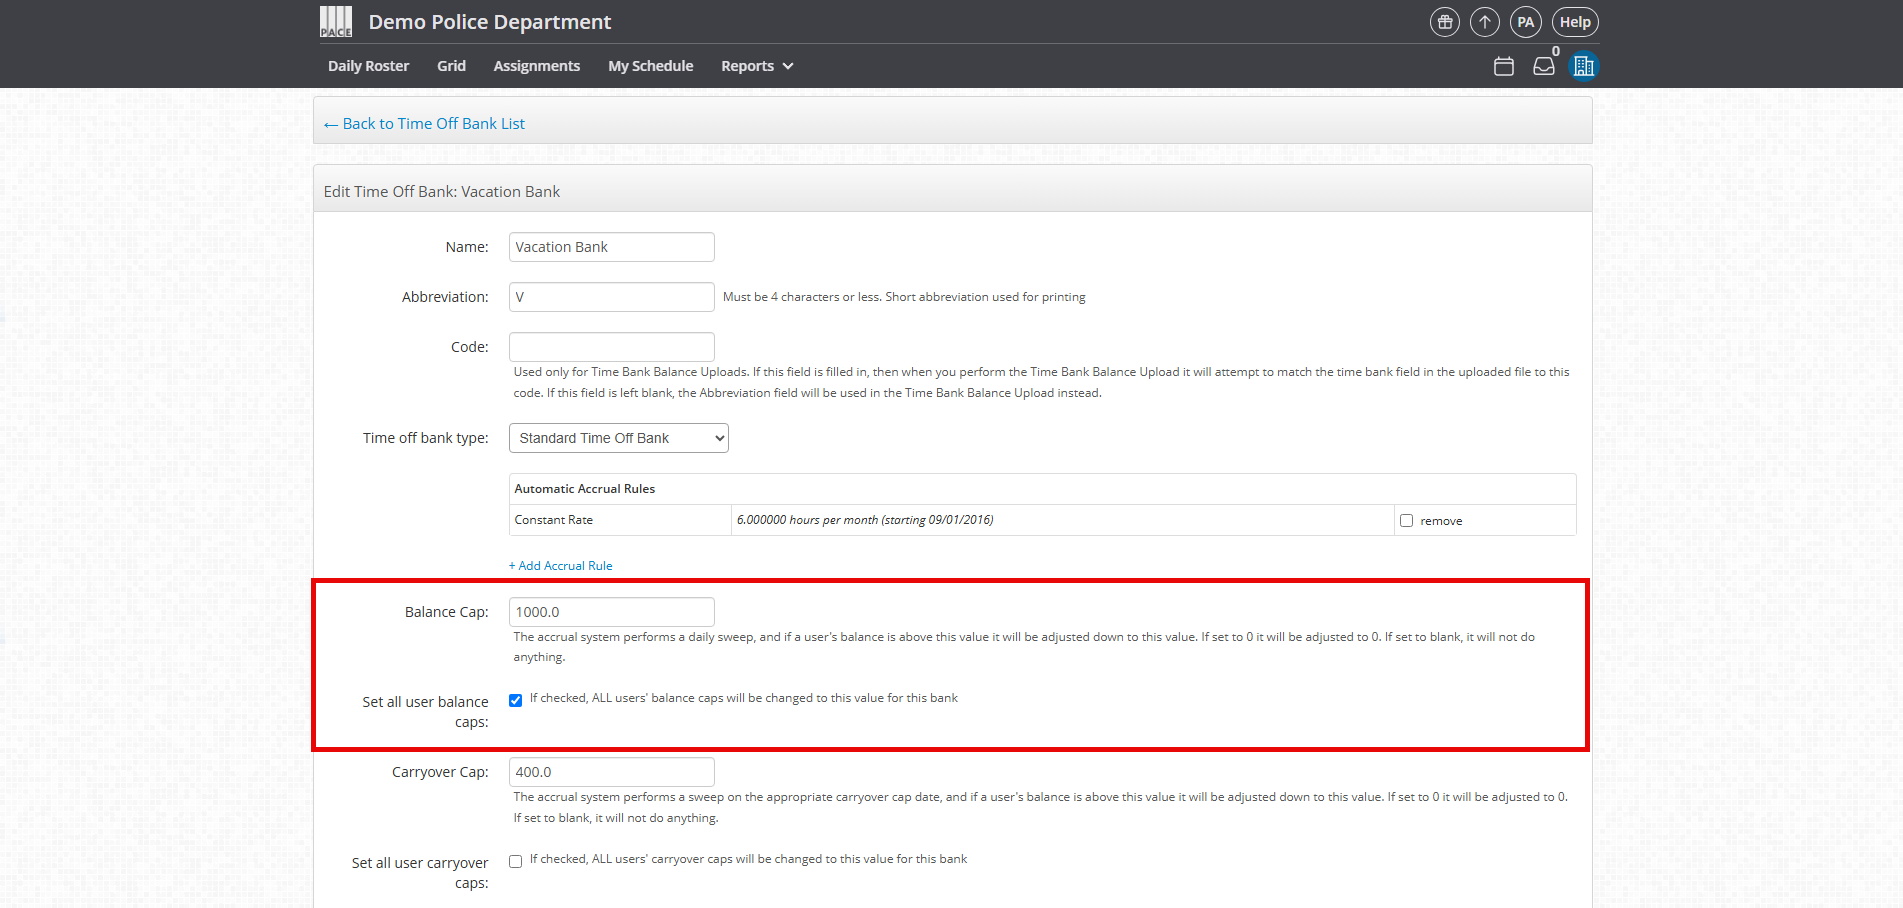
Apply a Department-Wide Balance Cap
-
Go to Admin Panel > Banks & Balances > Time Banks.
-
Click Edit next to the bank.
-
Enter the desired number in the Balance Cap field.
-
Check the box labeled Set all user balance caps.
-
Click Save.
Leaving this field blank removes any cap. Entering “0” means no hours can be earned.
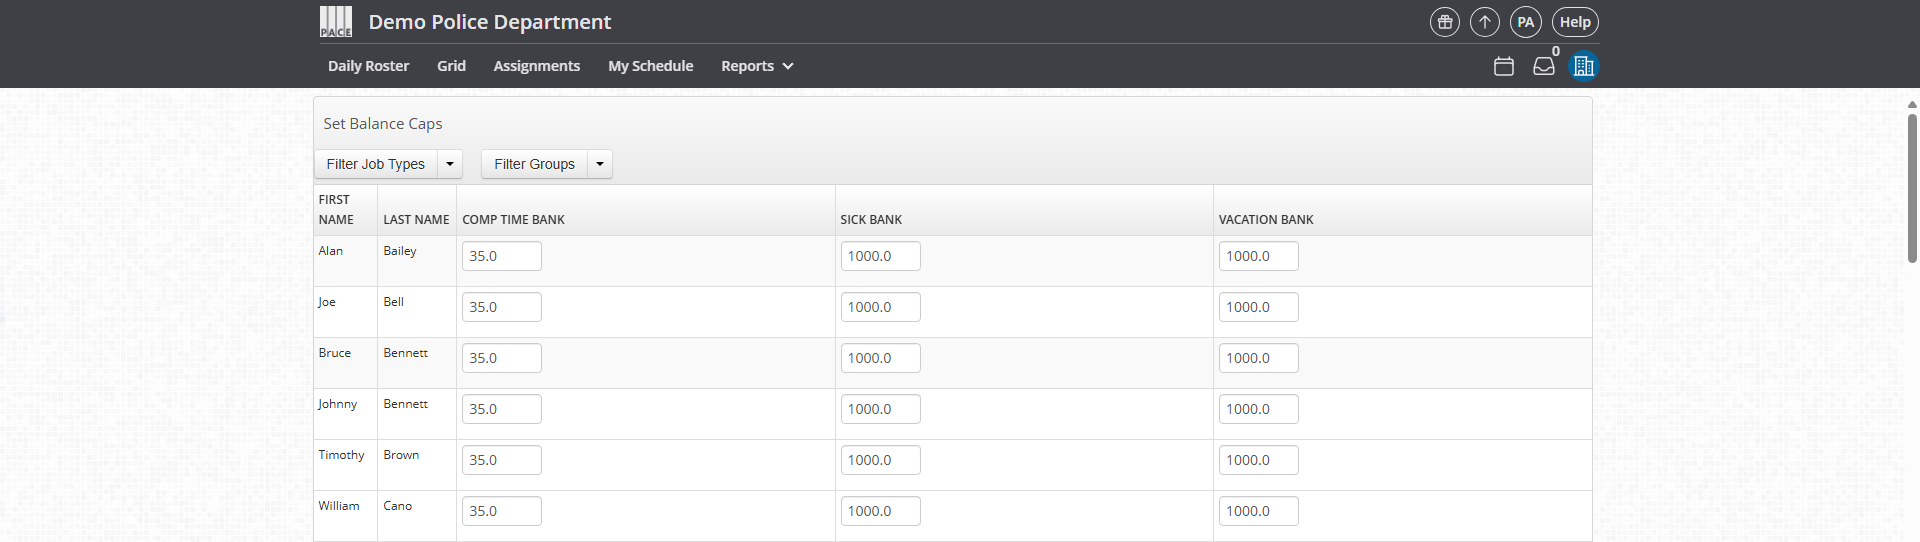
Apply Individual User Caps
-
Go to Admin Panel > Banks & Balances > User Balance Caps.
-
Find the employee you want to edit.
-
Enter their custom cap.
-
Click Save.
Confirm it worked
-
Submit a test Time Off or Overtime request to verify automatic deposits and deductions.
-
Check Admin Panel > Banks & Balances > Bank Balances to confirm balances update correctly.
-
Review the next day’s balances to confirm nightly sweep behavior for caps and carryover rules.
FAQ
Q: Can one Time Off Type link to multiple banks?
A: No. Each Time Off Type can only connect to one Time Bank, though a single bank can serve multiple types.
Q: How often do automatic accruals run?
A: They run according to the schedule defined in the bank’s accrual rule.
Q: Can balances be manually adjusted?
A: Yes. Edits under Admin Panel > Banks & Balances > Bank Balances save instantly and are fully logged.
Q: What’s the difference between a Balance Cap and a Carryover Cap?
A: A Balance Cap limits how many hours can exist at any time. A Carryover Cap limits how many hours roll into a new year.
Q: Can linked banks share accrual rules automatically?
A: No. Accrual rules must be configured individually in each bank.

